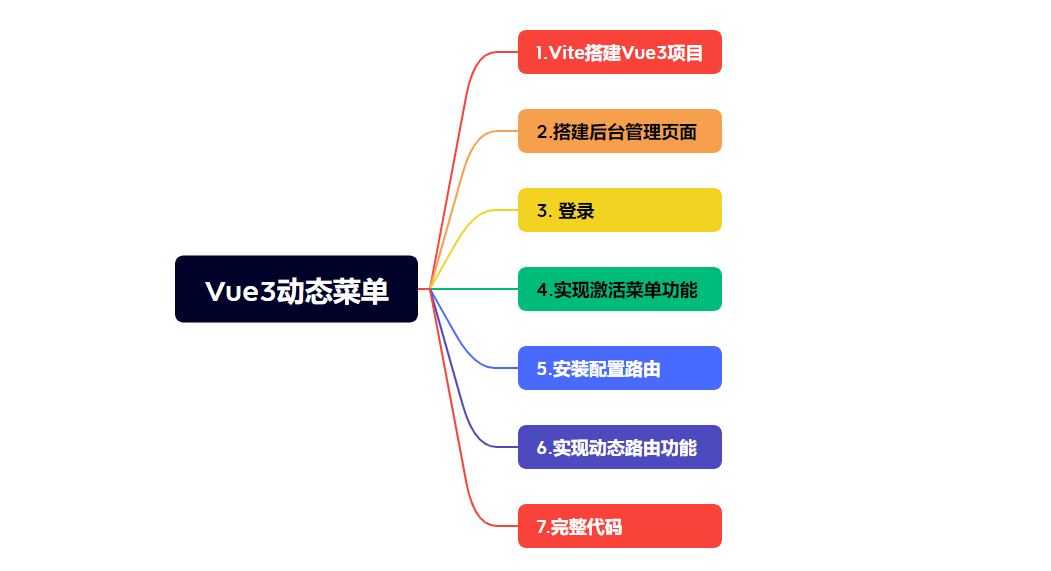
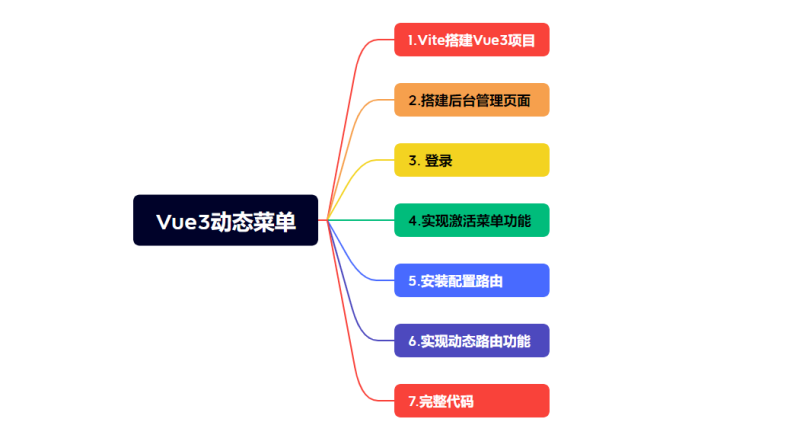
主要内容
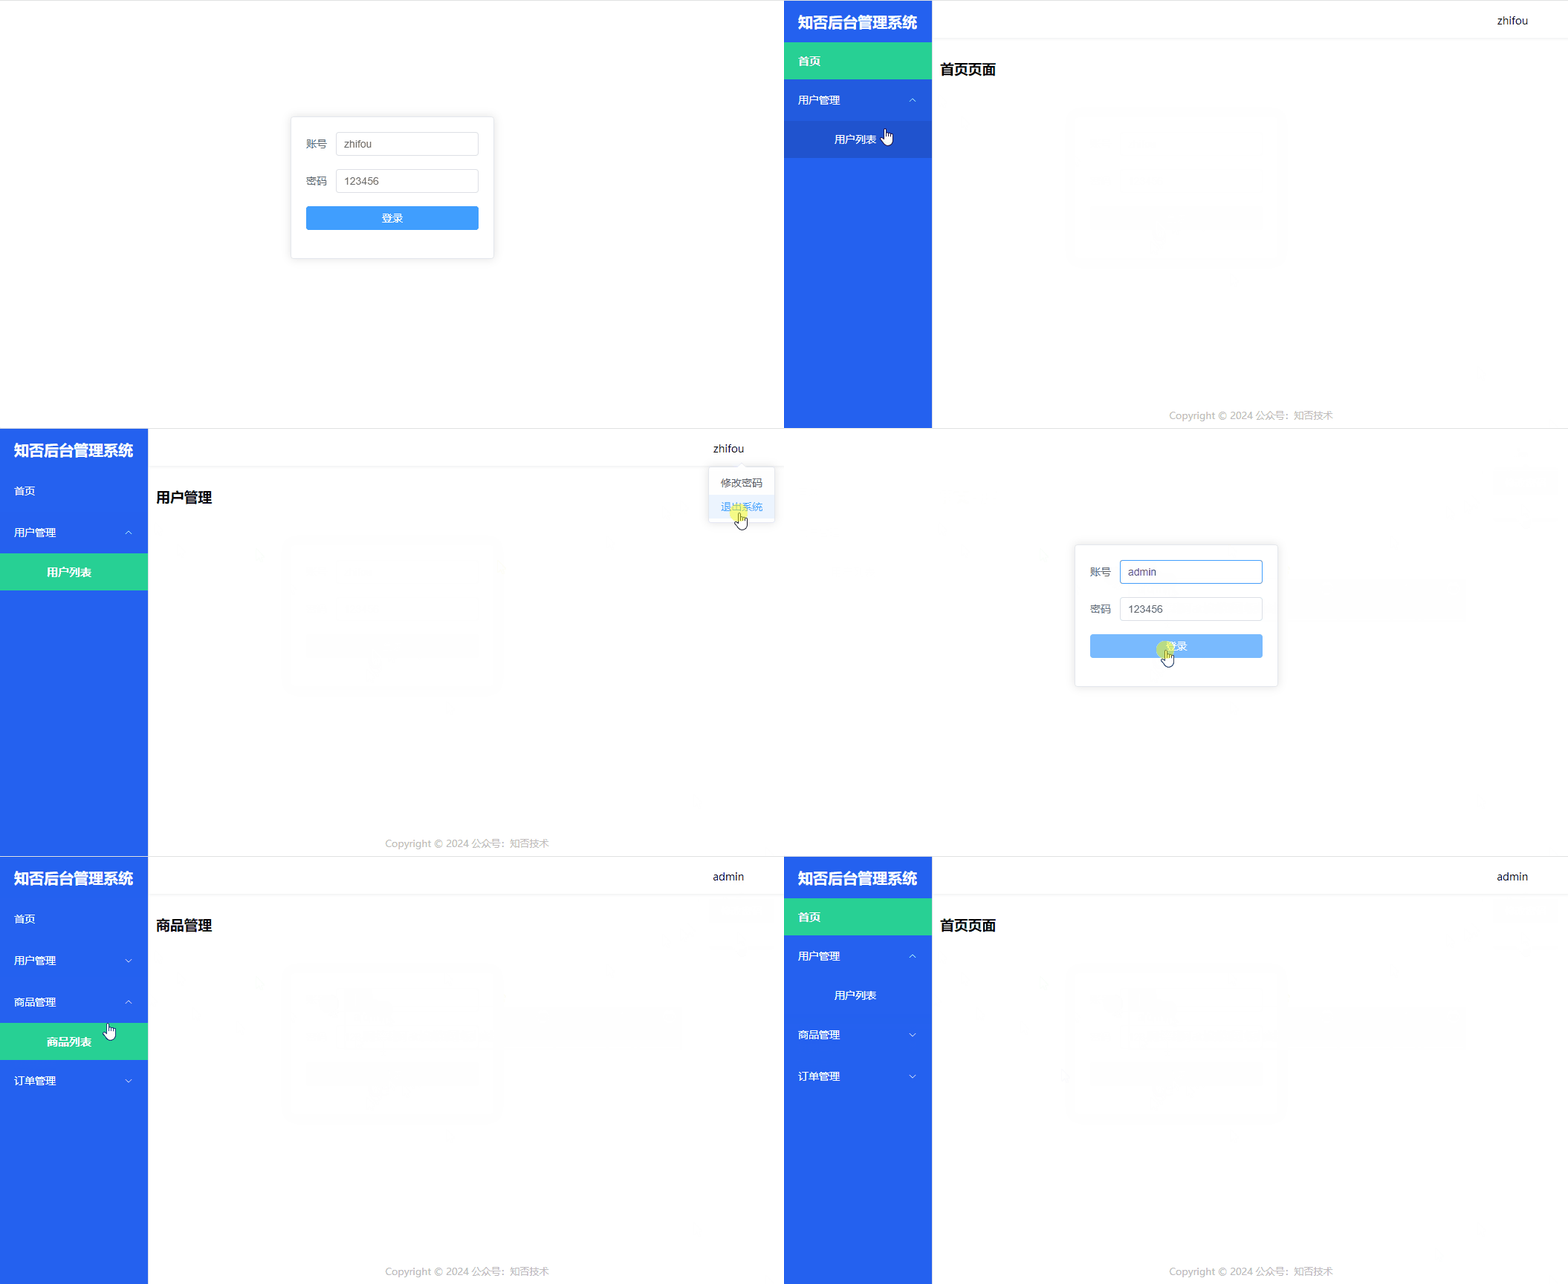
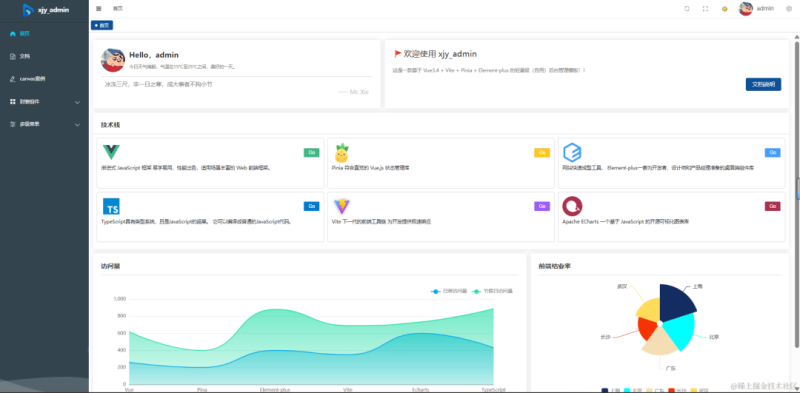
0.效果演示
1.搭建Vue3项目
1.1 vite 脚手架创建 Vue3 项目
npm create vite@latest vue3-zhifou -- --template vue
代码编辑器进入刚创建的项目文件夹里面
# 安装依赖
 npm install
# 启动程序
 npm run dev
修改 main.js
import { createApp } from 'vue'
import App from './App.vue'

const app = createApp(App);

app.mount('#app');
1.2 设置文件别名
在 vite.config.js 文件里面进行设置
import { defineConfig } from 'vite'
import vue from '@vitejs/plugin-vue'
import path from 'path';

export default defineConfig({
  plugins: [vue()],
  // 设置别名
  resolve: {
    alias: [
      {
        // 设置别名, '@' 指向 'src' 目录
        find: "@",
        replacement: path.resolve(__dirname, './src')
      }
    ]
  },
})
1.3 安装配置 element-plus
npm install element-plus --save
在 main.js里面配置 Element plus
import { createApp } from 'vue'
import App from './App.vue'
import ElementPlus from 'element-plus'
import 'element-plus/dist/index.css'
import locale from 'element-plus/es/locale/lang/zh-cn'
const app = createApp(App);
app.use(ElementPlus, { locale }).mount("#app");

1.4 安装配置路由
npm install vue-router --save
在 src 文件夹下新建 router 文件夹,然后新建 index.js
import { createRouter, createWebHashHistory } from "vue-router";
const routes = [
];
const router = createRouter({
  history: createWebHashHistory(),
  routes,
});
// 导出路由
export default router;

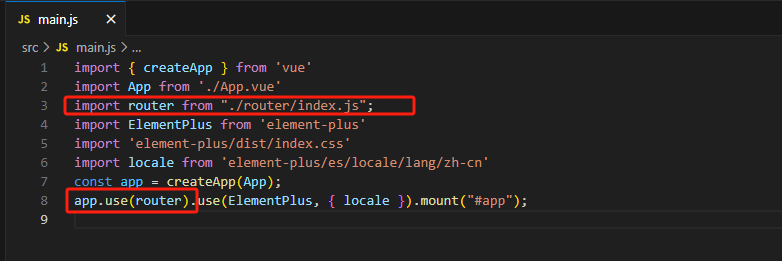
在 main.js 中配置路由
2.登录页面
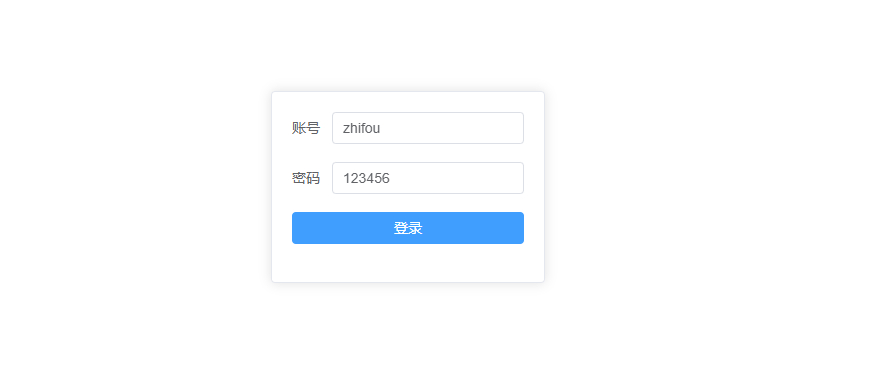
在 /src/view 文件夹下,新建 login.vue 文件
开发一个简单的登录页面
<el-card>
  <el-form :model="form">
    <el-form-item label="账号">
      <el-input v-model="form.username" />
    el-form-item>
    <el-form-item label="密码">
      <el-input v-model="form.password" />
    el-form-item>
    <el-form-item>
      <el-button type="primary" style="width: 100%" @click="onSubmit">登录
3.后台管理页面
3.1 搭建后台框架
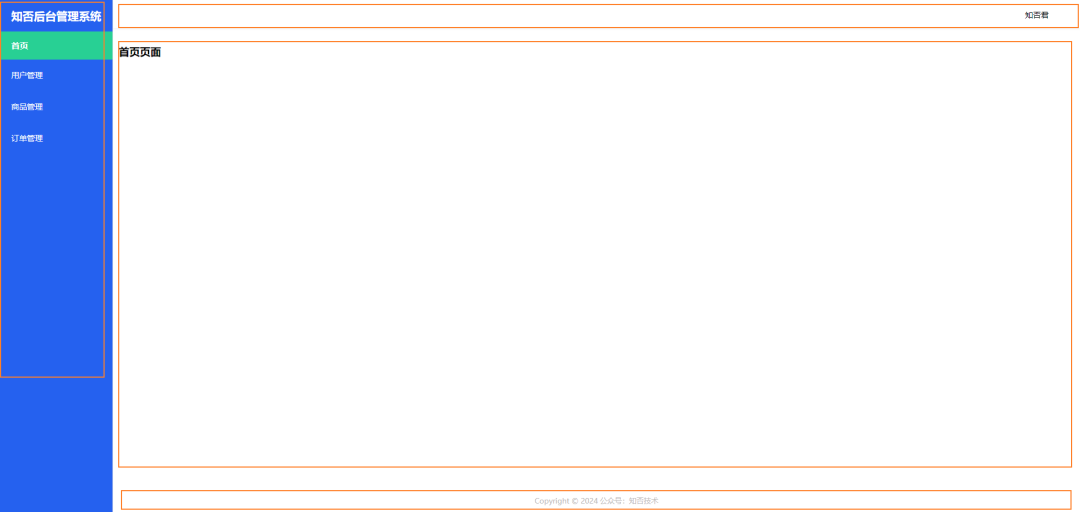
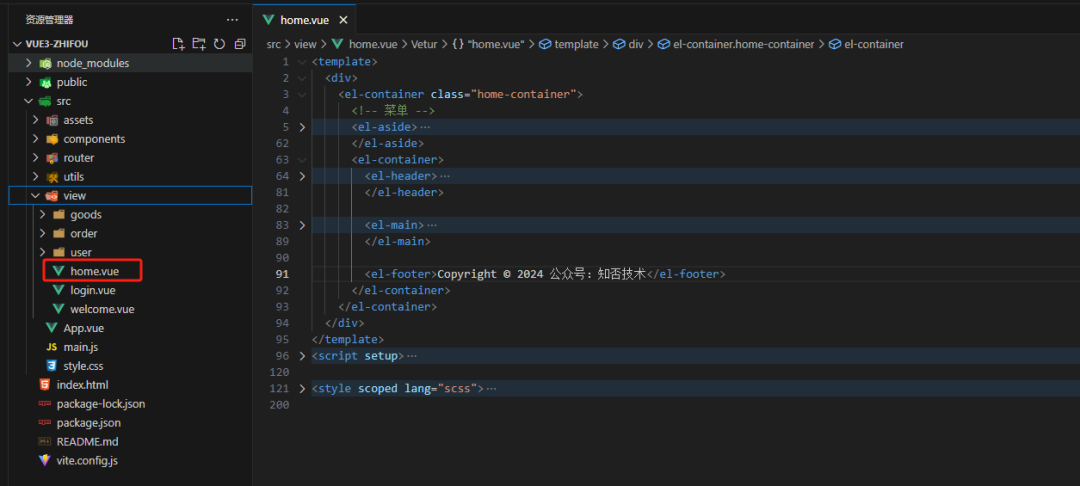
后台管理页面布局我们采用 element-plus 的 Container 组件,最左侧是菜单栏,头部展示用户信息,Main 展示主要内容,footer 展示公司版权信息。

我们在 /src/view 文件夹下新建 home.vue 文件
3.2 左侧菜单栏
我们在 el-aside 里面添加 el-menu 菜单组件,配置4个菜单:首页、用户管理、订单管理、商品管理。
el-menu-item 组件里面 index 属性是唯一标识,el-menu 组件里面 router 属性表示以 index 的属性值作为路由。
  <el-menu
    background-color="#2561ef"
    text-color="#fff"
    router
    :default-active="activePath"
    class="el-menu-style"
  >
    <el-menu-item style="background-color: #2561ef">
      <span style="font-size: 20px; font-weight: bold">知否后台管理系统span>
    el-menu-item>
    -- 首页 -->
    <el-menu-item
      index="/index"
      @click="
        saveActiveNav('/index', {
          title: '首页',
          name: '首页',
        })
      "
    >
      <template #title>首页template>
    el-menu-item>
    <el-menu-item
      index="/user"
      @click="
        saveActiveNav('/user', {
          title: '用户管理',
          name: '用户管理',
        })
      "
    >
      <template #title>用户管理template>
    el-menu-item>
    <el-menu-item
      index="/goods"
      @click="
        saveActiveNav('/goods', {
          title: '商品管理',
          name: '商品管理',
        })
      "
    >
      <template #title>商品管理template>
    el-menu-item>
    <el-menu-item
      index="/order"
      @click="
        saveActiveNav('/order', {
          title: '订单管理',
          name: '订单管理',
        })
      "
    >
      <template #title>订单管理template>
    el-menu-item>
  el-menu>
3.3 header 用户信息
我们在 el-header 里面添加 el-dropdown 组件
<el-dropdown style="float: right; margin: 20px">
<span class="el-dropdown-link">
{{ userForm.username }}
<el-icon class="el-icon--right">
<arrow-down />
el-icon>
span>
<template #dropdown>
<el-dropdown-menu>
<el-dropdown-item @click.native="toUpdatePassword"
>修改密码 >
"logout">退出系统
3.4 主要内容
我们在 el-main 里面添加 router-view ,这里也是展示内容的地方
<el-main>
  <router-view v-slot="{ Component }">
    <transition name="fade-transition" mode="out-in">
      <component :is="Component" />
    transition>
  router-view>
el-main>
3.5 footer
<el-footer>Copyright © 2024 公众号:知否技术el-footer>
4.配置静态路由
我们在 view 文件下分别创建 home、welcome、goods、order、user 这几个页面

然后配置静态路由:用户在登录成功之后默认是进入到后台首页

在 router/index.js 里面,配置 routes
const routes = [
  {
    path: "/",
    redirect: "/login",
  },
  {
    path: "/login",
    name: "login",
    meta: {
      title: "登录",
    },
    component: () => import("../view/login.vue"),
  },
  {
    path: "/home",
    name: "主页",
    meta: {
      title: "主页",
    },
    component: () => import("../view/home.vue"),
    redirect: "/index",
    children: [
      {
        path: "/index",
        name: "index",
        meta: {
          title: "首页",
        },
        component: () => import("../view/welcome.vue"),
      }, {
        path: "/user",
        name: "user",
        meta: {
          title: "用户管理",
        },
        component: () => import("../view/user/index.vue"),
      },
      {
        path: "/goods",
        name: "goods",
        meta: {
          title: "商品管理",
        },
        component: () => import("../view/goods/index.vue"),
      },
      {
        path: "/order",
        name: "order",
        meta: {
          title: "商品管理",
        },
        component: () => import("../view/order/index.vue"),
      },
    ],
  },
];

5.记录激活菜单
我们在点击菜单之后,需要用不同的样式来区分激活和未激活的菜单。

1.el-menu 绑定 default-active 属性

2.菜单添加点击事件

// 当前激活的路由
let activePath = ref("");
// 保存链接的激活状态
const saveActiveNav = (path) => {
  // 当前激活的菜单
  activePath.value = path;
  sessionStorage.setItem("activePath", path);
};
3.初始化激活菜单
// 挂载 DOM 之前
onBeforeMount(() => {
  // 当前激活的菜单
  activePath.value = sessionStorage.getItem("activePath")
    ? sessionStorage.getItem("activePath")
    : "/index";
});
6.动态路由
在企业级项目中,除了首页,左侧的菜单栏都不是固定的。
一般都需要管理员配置权限,然后动态生成菜单栏。
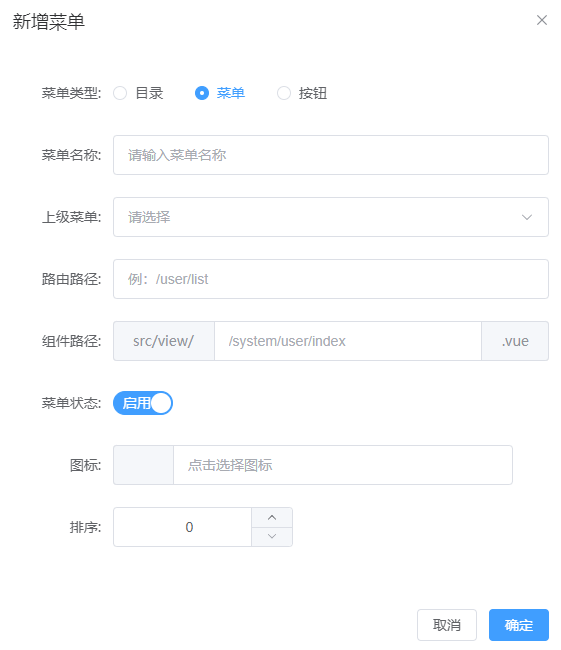
在 Vue 中动态设置菜单栏的核心是:
router.addRoute(route)
其实就是我们在登录之后获取到菜单列表,然后将菜单封装成 route 对象,并添加到 router 里面。
addRoute 方法其实就是将后台返回的菜单 json 数据封装成了以下样式:

接下来讲一下 Vue 实现动态菜单的过程:
6.1 登录成功存储数据
后台返回的菜单数据一般是以下格式,比较重要的就是 path 和 component。
其中 path 就是要跳转的路由路径,component 就是指的项目中 vue 页面的路径。
 {
      id: 87,
      parentId: 69,
      name: "用户列表",
      type: 1,
      path: "list",
      component: "user/index",
      perms: "",
      children: null,
}
这里我们模拟一下登录接口,根据不同的用户角色返回不同的菜单数据。
然后将后台返回的数据存储在浏览器缓存中,并跳转到后台页面。
const onSubmit = () => {
  // 角色1对应的菜单数据
  let menusOne = [
    {
      id: 69,
      parentId: null,
      name: "用户管理",
      type: 0,
      path: "/user",
      component: "",
      perms: "",
      children: [
        {
          id: 87,
          parentId: 69,
          name: "用户列表",
          type: 1,
          path: "list",
          component: "user/index",
          perms: "",
          children: null,
        },
      ],
    },
    {
      id: 78,
      parentId: null,
      name: "商品管理",
      type: 0,
      path: "/goods",
      component: "",
      perms: "",
      children: [
        {
          id: 78,
          parentId: 79,
          name: "商品列表",
          type: 1,
          path: "list",
          component: "goods/index",
          perms: "",
          children: null,
        },
      ],
    },
    {
      id: 88,
      parentId: null,
      name: "订单管理",
      type: 0,
      path: "/order",
      component: "",
      perms: "",
      children: [
        {
          id: 89,
          parentId: 88,
          name: "订单列表",
          type: 1,
          path: "list",
          component: "order/index",
          perms: "",
          children: null,
        },
      ],
    },
  ];
  // 角色2对应的菜单数据
  let menusTwo = [
    {
      id: 69,
      parentId: null,
      name: "用户管理",
      type: 0,
      path: "/user",
      component: "",
      perms: "",
      children: [
        {
          id: 87,
          parentId: 69,
          name: "用户列表",
          type: 1,
          path: "list",
          component: "user/index",
          perms: "",
          children: null,
        },
      ],
    },
  ];
  // 模拟登录请求
  const res = {
    data: {
      code: 200,
      menuList: [],
      message: "请求成功",
    },
  };
  if (form.username === "admin") {
    res.data.menuList = menusOne;
  } else {
    res.data.menuList = menusTwo;
  }
  sessionStorage.setItem("menuList", JSON.stringify(res.data.menuList));
  sessionStorage.setItem("userInfo", JSON.stringify({ username: form.username }));
  router.push("/home");
};
6.2 路由导航守卫动态配置路由
1.先从缓存中获取菜单数据。
2.调用 filterRouter 方法,将菜单数据封装成 route 对象
3.调用 router.addRoute 方法动态添加路由
// 挂载路由导航守卫:to表示将要访问的路径,from表示从哪里来,next是下一个要做的操作
router.beforeEach((to, from, next) => {
  // 修改页面 title
  if (to.meta.title) {
    document.title = "知否技术 - " + to.meta.title;
  }
  // 放行登录页面
  if (to.path === "/login") {
    return next();
  } else {
    const menuList = JSON.parse(sessionStorage.getItem("menuList"));
    const menus = filterRouter(menuList);
    menus.forEach((route) => {
      router.addRoute(route);
    });
    return next();
  }
});

const filterRouter = (menuList) => {
  // import.meta.glob 作用是 Vite 特有的功能,它允许你在模块内部匹配多个模块,基于文件系统的模式
  const modules = import.meta.glob("../view/**/*.vue");
  // 遍历菜单数据
  for (let index = 0; index < menuList.length; index++) {
    // 获取父菜单
    const e = menuList[index];
    // 因为我们在 home 页面的 el-main 设置了 router-view ,所以这里父级菜单默认指向 home页面
    e.component = modules["../view/home.vue"];
    // 遍历子菜单,
    for (let index = 0; index < e.children.length; index++) {
      const item = e.children[index];
      // 导入组件
      item.component = modules[`../view/${item.component}.vue`];
    }
  }
  return menuList;
};
6.3 解决刷新页面,页面空白的问题
1.新建 permission.js 文件,动态封装路由
import router from "../router";
const filterRouter = () => {
  // 从sessionStorage 获取用户的菜单数据
  const menuList = JSON.parse(sessionStorage.getItem("menuList")) || [];
  // import.meta.glob 作用是 Vite 特有的功能,它允许你在模块内部匹配多个模块,基于文件系统的模式
  const modules = import.meta.glob("../view/**/*.vue");
  // 遍历菜单数据
  for (let index = 0; index < menuList.length; index++) {
    // 获取父菜单
    const e = menuList[index];
    // 因为我们在 home 页面的 el-main 设置了 router-view ,所以这里父级菜单默认指向 home页面
    e.component = modules["../view/home.vue"];
    // 遍历子菜单,
    for (let index = 0; index < e.children.length; index++) {
      const item = e.children[index];
      // 导入组件
      item.component = modules[`../view/${item.component}.vue`];
    }
  }
  return menuList;
};
export const initRouter = async () => {
  const menus = await filterRouter();
  menus.forEach((route) => {
    router.addRoute(route);
  });
};
2.App.vue 页面初始化路由数据
<template>
  <div>
    <router-view> router-view>
  div>
template>
<script setup>
import { onMounted } from "vue";
import { initRouter } from "./utils/permission";
import router from "./router";
// 解决刷新页面,页面空白的问题
onMounted(async () => {
  await initRouter();
  // 获取路由 path 地址,并跳转
  router.replace(router.options.history.location);
});
script>
7.完整代码
链接:https://pan.baidu.com/s/19MdeZzuLKOiWsS-sQM4TfA?pwd=1234
提取码:1234
往期推荐

- 1. 本站名称: 橘子缤纷乐园
- 2. 本站网址: https://blog.zuziy.cn
- 3. 本网站的文章部分内容可能来源于网络,仅供大家学习与参考,如有侵权,请联系站长进行删除处理。
- 4. 本站一切资源不代表本站立场,并不代表本站赞同其观点和对其真实性负责。
- 5. 本站一律禁止以任何方式发布或转载任何违法的相关信息,访客发现请向站长举报。
- 6. 本站附件资源、教程等内容如因时效原因失效或不可用,请评论区留言或联系站长及时更新。




![[开源]一个基于Tauri、Vite 5、Vue 3 和 TypeScript 构建即时通讯系统-橘子缤纷乐园](https://cos.zuziy.cn/wp-content/uploads/2024/08/frc-504721f6f5fd2011d936dfad90b349a4.jpeg)



暂无评论内容